
Wednesday, December 8, 2010

Tuesday, December 7, 2010
Button Bracelet

Don't you just love all of the buttons Suzan used to make this.
Here's a picture of me wearing it (ignore the old lady arm).


Yardstick Star
I took five of the yardsticks that had a similar width and laid out a 5 point star.

Once the star was lined up I drilled holes through each point of the star and inserted one of these nuts into the front of each point and screwed the bolt on the back.

Here's the front of one of the points.

And here's the back.

Here's what your star should look like.

There's one last step I needed to do to the star before it was finished. I took one small screw and screwed it into one of the areas where the yardsticks cross each other. This insures that the wood will not shift, causing the star to lose it's shape.

Now the star is ready to be displayed.


Wednesday, December 1, 2010
Repurposed Keys and Vintage Jewels
I've been having so much fun with the keys and vintage jewels I purchased a few weeks ago at an antique faire. But, I have this problem when faced with a mound of repurposing choices. It's a little like shopping in a huge mall with hundreds of stores, and then walking out without purchasing a thing. With too many choices, I just end up over thinking the whole thing. Do you ever have that problem?
I know, I know, too many choices really isn't a problem, but it can be distracting. My new found solution is to pick out only a few pieces at a time to work on, and then try to keep my eyes off the pile of vintage goodies staring back at me. I'm much more productive this way. Focus, focus, focus......


I know, I know, too many choices really isn't a problem, but it can be distracting. My new found solution is to pick out only a few pieces at a time to work on, and then try to keep my eyes off the pile of vintage goodies staring back at me. I'm much more productive this way. Focus, focus, focus......
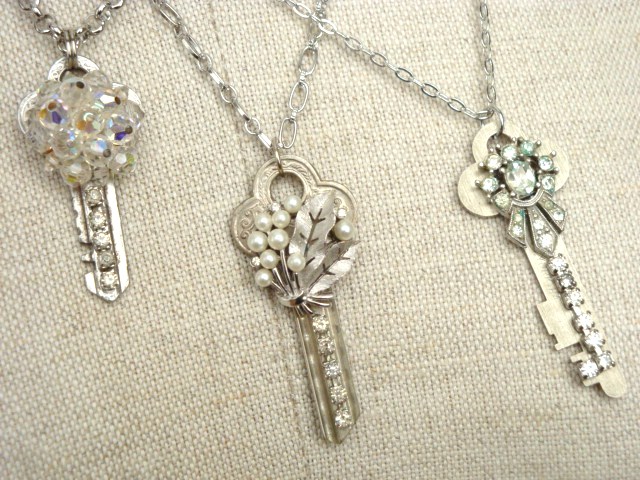
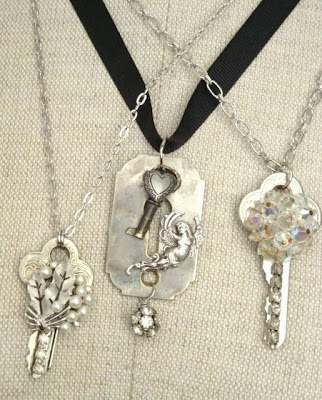
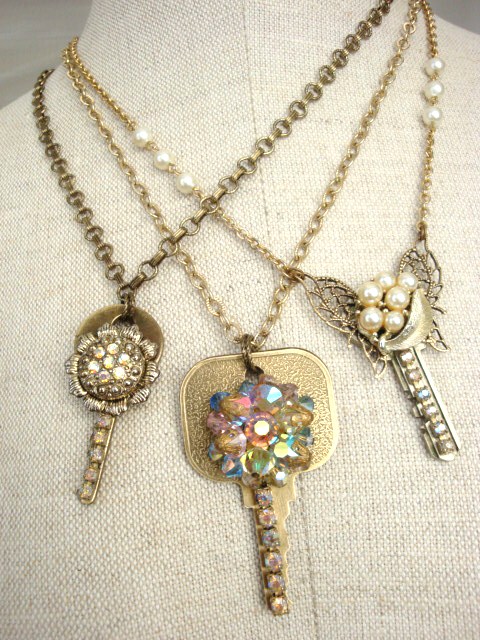
The six of these key necklaces were made with vintage clip on earrings and pieces of rhinestone necklaces.

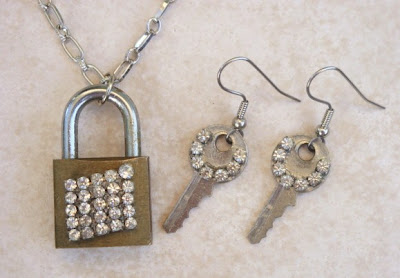
I added a bit of bling to these tiny 1" keys and their little lock. The keys
still open the lock.
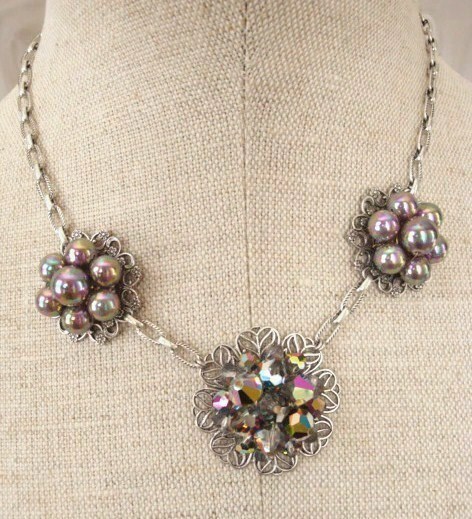
Three clip on earrings and antiqued filigrees.

Keys, keys, and more keys.
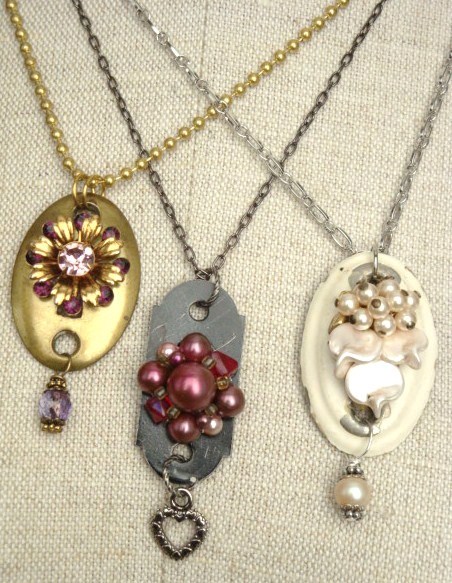
Vintage earrings and chippy old key escutcheons.
Tuesday, November 30, 2010

Paint is good. It is inexpensive, easy to apply and can transform any room in a matter of hours. We like to paint and find ourselves repainting rooms often. I thought I’d share some of the colors we currently have in our home. They are neutrals {no surprise there} and they go with everything, but be sure to try out a sample in your home to see how the color looks in different light.
T H E E N T I R E H O U S E
Our home was painted from top to bottom in a great neutral wheat/gray/beige by Rodda {HFH09 – relaxed khaki}. This is the color that is in our entry, the base coat of my office and the stripes in the boys’ room. However, I can’t find a sample online and I believe Rodda is only found in the Pacific Northwest, so here are some comparable ones I found by holding up my Benjamin Moore {BM} fan deck to my walls.

BM hazy skies {OC-48}

BM grant beige {HC-83}
T H E D I N I N G R O O M

BM berkshire beige {AC-2}
T H E K I T C H E N
This is the color on the top of the walls.

BM texas leather {AC-3}
T H E L I V I N G R O O M
Our walls have been this gray-blue for the past few years

farrow & ball light blue
but we’ve just repainted the room with this new color

restoration hardware slate
T H E N U R S E R Y
This is a soft blue-gray that doesn’t really look like this swatch on the walls. Sorry about that. It is a bit lighter and softer in real life.

Behr rhino {710E-3}
It is pretty similar to the ever-popular Silver Sage from Restoration Hardware

restoration hardware silver sage
The bed & shelves in the nursery are painted this sludgy gray-blue-green {also not very well-represented by this image}

Sherwin Williams rushing river {SW2093}
Need a few more suggestions? Here are a couple of pretty ones:

BM revere pewter {HC-172}

farrow & ball mouse’s back
** NOTE: while you can never get the color to match perfectly, we typically have the paint swatches color matched at our local hardware store. It is not the fanciest paint, but seems to do the trick **
Thursday, November 18, 2010
Glass Tile Pendants
 Remember when I gave a pendant to a random follower? Sad you didn't win? Well don't fret because I'm going to do a quick run-down on how to make a glass tile pendant. I first saw a how-to atTrey and Lucy but have seen several other tutorials as well. Here's my take.
First gather your supplies - you'll need:
--a glass tile,
--a bail (that's the hook that goes on the back),
--paper or fabric design,
--diamond glaze and a small paintbrush,
--superglue,
--and a chain to hang it on.
I bought all my supplies from CandyTiles and was really impressed. I especially like her bundle packs - you don't have to think because it has everything - you can get 20 bails, 20 tiles, 20 chains, and a bottle of diamond glaze for $33.50 - perfect. And prices get better as you order more - I organized this craft for moms to do at our playgroup and ended up ordering 2 100 Bundle Packs - so make it a party!
** update - 10% off at CandyTiles if you enter "SugarBeez" in the message area when you check out**
Take your tile, and trace it onto your paper. Then cut it out slightly inside the lines. You can use an exacto knife but I just used scissors. Hold it up with your tile on top of it to check the size - you don't want any paper sticking out behind the edge.

Squirt your diamond glaze on the back of the tile - about pea size. Use a small paintbrush to spread it out - enough to coat the back of the tile but not so much that it's going to ooze.

Then while the diamond glaze is still wet set your paper face-down onto it. Rub the paper to get a really good seal.

Let dry for 5-10 mintues or longer. Then squirt diamond glaze on the back of the paper and spread it out with a paintbrush to seal in your paper. Let dry several hours. Then using superglue, glue your bails to the back. (Don't use Gorilla Glue - it foams a little so it won't look as clean around your bail)

We had a great time making these - and so will you!
Wednesday, November 10, 2010
How to Fold a Burlap Rose
Hi there fellow burlap lovers!!!
It was so fun when the Ronda Handbag was featured in the spring 2010 edition of Haute Handbags Magazine....!!!! I was so honored! Now, as promised: here are the instructions that were promised in the article: A a fabulous folded burlap rose made of a strip of burlap.
It was so fun when the Ronda Handbag was featured in the spring 2010 edition of Haute Handbags Magazine....!!!! I was so honored! Now, as promised: here are the instructions that were promised in the article: A a fabulous folded burlap rose made of a strip of burlap.

They are sooooo fun and quite easy to make.....!!!
View this short video to see how.
Have a happy burlap folding, rose making~ kinda day!!!
:) Crystelle
Have a happy burlap folding, rose making~ kinda day!!!
:) Crystelle
How to Fold a Burlap Rose
Hi there fellow burlap lovers!!!
It was so fun when the Ronda Handbag was featured in the spring 2010 edition of Haute Handbags Magazine....!!!! I was so honored! Now, as promised: here are the instructions that were promised in the article: A a fabulous folded burlap rose made of a strip of burlap.
It was so fun when the Ronda Handbag was featured in the spring 2010 edition of Haute Handbags Magazine....!!!! I was so honored! Now, as promised: here are the instructions that were promised in the article: A a fabulous folded burlap rose made of a strip of burlap.
They are sooooo fun and quite easy to make.....!!!
View this short video to see how.
Have a happy burlap folding, rose making~ kinda day!!!
:) Crystelle
Have a happy burlap folding, rose making~ kinda day!!!
:) Crystelle
It's a sign~
Every time I step into my favourite second hand shops I always seem to stop and stare at the pile of silver trays and plates that are constantly accumulating on the shelves. For the longest time I've been trying to figure out what I could do with them, but no matter how hard I stared at them, nothing would come to me.
And then I picked up the latest edition of Somerset Home. There it was, right in front of me...the perfect project!
Angela Harris from yourangil.blogspot.com created beautiful objects with these trays to decorate her home and send out affirmation messages to her family. I was so excited when I saw this, I knew that I had to make some for my house too!
Here are the supplies that I used:
 Most important are the trays, the chalkboard paint and a brush, and some tape. The rest is just fun embellishments~
Steps
1) Lightly clean the area that you will be applying the chalkboard paint to.
I did a little research on cleaning silver (apparently toothpaste and a soft cloth are the way to go) but I quickly decided that what I loved about thiese little treasures was the patina. It gives them character and age. So, I left the rest of the tray alone and continued.
2) Tape around the area that you want covered with chalkboard paint. This was my first experience using chalkboard paint and I thought that this step would ensure a nice clean edge....sadly it did not. It wasn't bad but when I removed the tape it did lift some of the paint. So, if you have an ultra steady hand you can skip this step. Otherwise, just be super gentle when you remove the tape later on.

3) Paint the chalkboard paint onto the tray. Give it 2-3 coats alternating the direction of your brush strokes on each layer. It takes about an hour or so to dry in between each layer depending on how thick you paint it on.

4) Once the last layer of paint has dried thoroughly very, VERY gently remove the tape. Now for the fun part - embellishing!! Tie on pretty ribbons, sparkly butterflies, and other things to personalize them. If your tray doesn't have handles or a filigree edge, you can use a hot glue gun to attach things.

5) Write special messages on the trays for your guests or family members and hang on doors or special places.


Aren't they gorgeous?!?!? I hung the one above on the outside of my washroom door.
And the one below hangs on the door knob to my guest room.

I thought that I'd be able to set this one on the door casing outside of my studio but it wouldn't stay up there. I ended up using a 3M Command Strip and sticking it right to the wall. I love it!


And then I picked up the latest edition of Somerset Home. There it was, right in front of me...the perfect project!
Angela Harris from yourangil.blogspot.com created beautiful objects with these trays to decorate her home and send out affirmation messages to her family. I was so excited when I saw this, I knew that I had to make some for my house too!
Here are the supplies that I used:

Steps
1) Lightly clean the area that you will be applying the chalkboard paint to.
I did a little research on cleaning silver (apparently toothpaste and a soft cloth are the way to go) but I quickly decided that what I loved about thiese little treasures was the patina. It gives them character and age. So, I left the rest of the tray alone and continued.
2) Tape around the area that you want covered with chalkboard paint. This was my first experience using chalkboard paint and I thought that this step would ensure a nice clean edge....sadly it did not. It wasn't bad but when I removed the tape it did lift some of the paint. So, if you have an ultra steady hand you can skip this step. Otherwise, just be super gentle when you remove the tape later on.

3) Paint the chalkboard paint onto the tray. Give it 2-3 coats alternating the direction of your brush strokes on each layer. It takes about an hour or so to dry in between each layer depending on how thick you paint it on.

4) Once the last layer of paint has dried thoroughly very, VERY gently remove the tape. Now for the fun part - embellishing!! Tie on pretty ribbons, sparkly butterflies, and other things to personalize them. If your tray doesn't have handles or a filigree edge, you can use a hot glue gun to attach things.

5) Write special messages on the trays for your guests or family members and hang on doors or special places.


Aren't they gorgeous?!?!? I hung the one above on the outside of my washroom door.
And the one below hangs on the door knob to my guest room.

I thought that I'd be able to set this one on the door casing outside of my studio but it wouldn't stay up there. I ended up using a 3M Command Strip and sticking it right to the wall. I love it!


Sunday, October 17, 2010
tea staining
small measures with ashley: tea staining  Image above: Lampshade before tea staining I’ve long been a fan of color. While I know that an all-white room, a set of stark white dinnerware or even a simple white T-shirt appeals to many, it has never been my cup of tea (no pun intended). When my family vacationed in Florida two summers ago and my Pop wanted a family photo of us in jeans and white shirts, I had to borrow one from my younger sister. A high-school friend’s father used to joke that I always looked like I was headed to a funeral (although, in my defense, those were the days when I, along with many others, was deeply entrenched in all things Anne Rice and Robert Smith). Heck, even my wedding dress, which I had custom-made by local Asheville designer R. Brooke Priddy, was a deep red. To date, the only white apparel I own is a pair of ankle socks that, worn with my black Dansko clogs all summer long to keep my feet nice and dry, remain squarely out of sight. You can imagine my relief, then, when I met my husband and found he shared my color predilections. Not only did he vibe-out on a similar color palette (think autumn and winter hues), he’s a professional color consultant, having earned his MFA from Penn with a concentration in color theory and painting. Our home is rife with color: pumpkin in the kitchen, merlot in the dining room, deep olive in the bathroom, espresso in the living room, mustard in our bedroom, moss and mushroom in Nugget’s room, battleship gray in the hall leading upstairs, sage in the guest bedroom/office, and more mushroom in the guest bathroom. Most of our decorations aren’t white, either. Occasionally, we come across something in the palest of shades that’s just too good to pass up. This was the case with our recent lampshade find. We needed another lamp in our living room to balance the lighting across the space. Hubs found a gorgeous specimen with a wooden base, but a white shade. Our solution? A tea-stained dye. We try to keep toxic chemicals out of our abode as much as possible, so a light tea stain seemed like the perfect remedy. It not only modified the color to something more to our liking, it warmed the overall light emitted from the lamp. In today’s Small Measures, I’ll explain our process and how you too can bring a deeper degree of color to some objects in your home.  While the process is quite straightforward, I would like to offer up the disclaimer that not all fabrics will take to tea staining. For the most part, cotton and linen are your best bets, as well as paper. If you’re wondering whether or not your chosen cloth will work, try staining a small, out-of-direct-view patch first. Otherwise, you should be all set. CLICK HERE for the how-to steps after the jump! Tea-Staining Fabrics 1. Boil 4 cups of water in a medium-sized pot. 2. Add 4 or more bags of strong black tea (we used Prince of Wales) to the boiling water, depending how dark you want your stain. 3. Continue to boil until the water is reduced by about half, around 20 to 30 minutes. 4. Remove from heat and allow tea to cool for about 10 minutes. 5. Place a towel underneath the object to be stained to absorb drips. 6. If you are staining a lampshade, like we did, perch the center of it on a vase or similar object to keep it raised above the towel (for drying). 7. Paint the tea on with a foam brush (that’s the route we chose), a regular brush, a rag or whatever works for you. 8. Be sure to brush out any streaks, unless you want them. 9. Use a lint-free towel to remove any drips, if necessary. 10. Let dry before handling.  And there you have it! Easy peasy. Several years ago, we picked up the framed vintage Japanese cloth above at Anthropologie. Originally, the matting on top of the fabric was stark white and, per my explanation above, it just didn’t suit us. So we used a tea stain for the matting, following the same process. We simply brushed the tea stain on with a paint brush and allowed it to dry thoroughly before placing it back over the cloth. What about you? Do you have any experiences with tea staining or using any other natural material to create a stain or dye? I’d love hear about it! — Ashley
| ||||||||||||||||||||||||||||||||||||||||||||||||||||||||||||||||||||||||||


Read more at Design*Sponge http://www.designspongeonline.com/2010/10/small-measures-with-ashley-tea-staining.html#ixzz12fMHLOj1
Subscribe to:
Posts (Atom)