Thursday, August 4, 2011

postcard table shabby, distressed


 read SO many blogs that seem to start their post sounding so smart
 yet I sit here just not knowing what exactly to say.
 I'm the first to admit that I'm NOT a brilliant (and that's a stretch) writer.
 I tend to write like I speak. Sometimes, not very well, lol.
 So, when I sit here I think to myself.
"what would I say if Ms./Mr. Reader were sitting infront of me?"
 Then I just start typing and to me I sound like an idiot.
 Today is no different.
 I will just start by saying that this is a table re-do.
 What I do best.
 I picked up this lil' table at the shop about a month ago.
Apparently it had been there for awhile and never sold
 so they wanted me to re-finish it and re-list it.
 The moment I saw it, I saw a very primitive piece.
 Although, when I started the process it developed into something a lil' diferent.
 Yea, I'm ok with that.
 So, without sanding or priming it I painted it a soft white color.
 Because it wasn't sealed before, I wanted the color of the
 stain to come threw after distressing.
 Lots of beachy yummy-ness.
 But, of course it's going in a different direction. 
 So I found this awesome graphic from Graphics Fairy.
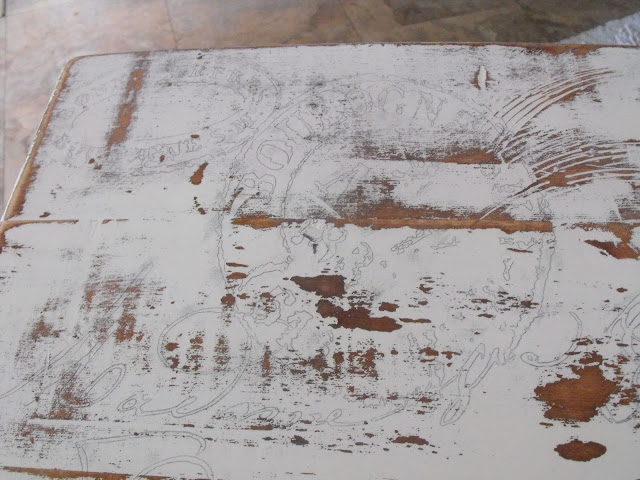
I enlarged it then did my technique of coloring the back with a pencil.
You can check out how I enlarge my images here.
Then I trace around everything which leaves the print on the table
and I use Elmer's paint pens in Black to color everything in.
 After some sanding and some Ralph Lauren Glaze in Smoke
 it's ready to be sealed with wax.
 Yup, I love how it turned out.
See, not too bad once I get it started : )

Sunday, July 3, 2011

candy bark


Gather your ingredients--you really could add anything to this that you want.
Melt your Almond Bark over very low heat or in the microwave.  Be careful because once it burns it is ruined.

**TIP**
When making Bark dab a little of your melted chocolate on each corner of your cookie sheet, then lay your parchment paper down and press over the melted chocolate.  It is like a glue and it holds the parchment in place.

Crumble your pretzels and Oreos over the parchment lined baking sheet
Drizzle the melted chocolate over the top of the pretzels and Oreos.  Spread chocolate with a spatula but don't drag the oreos too much or your chocolate will get yucky looking.

Once the chocolate is smoothed over your pretzels and Oreos, sprinkle with red, white and blue sprinkles.
Add red and blue M&Ms over the top. 
Place in the fridge until chocolate is completely cooled. 

Make sure the Bark is completely solid before you start breaking it up.  I let mine sit for at least an hour in the fridge.
Just start breaking pieces off of the Bark until you get the desired size.  Enjoy!

Friday, June 10, 2011

fabric covered mats


It's a wrap

Wrapping mats in fabric or paper is one of my favorite tricks for drawing more attention to artwork or freshening up an outdated mat.  With the artwork for our bedroom in mind, I hit pinterest looking for some inspiration:
wrapped in scrapbook paper
maps - love this! 
mixing up neutral fabrics adds interest, but keeps the look cohesive
 bold patterns!

And after finding all these beautiful, interesting choices online, I ended up using what I had.  {I probably realized I would do this before wasting all that time searching for ideas, but pinterest is addicting!}  

I started out with two thrifted frames with gosh-awful mats (think primary colors and bold, circus-like patterns).  Then I just followed Martha's instructions (loosely) and thirty minutes later ended up with my finished product.
still needs finishing touches as per these plans.....

Two of our favorite wedding photos - the church where we were married and an amazing shot our photographer captured of us leaving after the ceremony.

Wrapping the mats in fabric was super easy and definitely an improvement on the previous look.  It's a great {inexpensive} way to change up the look of artwork.  

Tuesday, June 7, 2011

map/canvas wall art

Ah Ha!  My son needed something on his wall in his room and since that is where I put the globe how about matching wall art! 
I went to Michaels and picked up a bunch of canvases at 40% off.  I spent 29.00 on all 12.  (yes, I admit the super thrifty side of me wishes it wasn’t that much….it would have sounded so much better to say I got all 12 for 5 bucks, but I can’t win them all.I don't know smile)  I traced around the canvas and cut out each rectangle.  The overall size was 31”x 50”

map canvas 001

                     (map was $2.00)
Next I spray painted the edges with a left over blue I had from this wine glass project.  I am a sucker for anything AGED looking so I spray painted some brown to the edges too.

map canvas 005

Once dry, I brushed on some glue and attached my cut out map pieces. 
map canvas 007
 
Once that dried (I turned them over to add some weight to the drying process) I wanted to age the edges just a little more so I took out my inking pad, or chalk pad, and “aged” the edges.  If you were really brave you could lightly sprayed some gold or brown spray paint on the corners to age it.  I also put a little brown glaze on the map itself to try to give it some more character.  I can’t decide if it was worth that extra step or not??  Anyway, once dry I came back and put Mod Podge over the top, quite thick,  and in criss cross strokes. 
VOILA!!!  Really, that wasn’t too hard.  Now I have a BIG piece of wall art for under 35.00! 

blk white color map
thickness map

(I bought that nice latter stand in the corner for 10 bucks! It has a storage drawer on the bottom too.)
Stay creative with me folks – even if you didn’t find a map at a thrift store you could take this same technique and make large canvas art.  I found this great tutorial on how to do that with printed scrapbook pages.  Just apply (glue) your photo to the canvas and cover with the mod podge.  It makes it look like a designer print on canvas.  The possibilities are endless.  How about cutting out a favorite fabric and applying that to the canvas? 

front view

Saturday, March 12, 2011

how to cut moldings/trim


Mouldings: An Easy How To

Mouldings can take furniture, cabinets, walls, etc. from boring & plain to being custom & beautiful. I was a little intimidated the first time I cut mouldings...but I knew I would get the hang of it. Now, I am cutting mouldings all of the time!
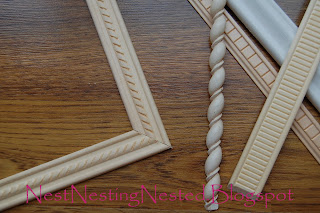
First, I will quickly show you how to cut mouldings to create a frame...framing out a door/window, picture framing, etc.


1
Set the miter angle at 45 degrees to the left

2
Place your moulding face up and flush with the fence of your saw.

3
Make your cut.

4
Reposition your miter angle to 45 degrees to the right

5
Cut the opposite end of the same moulding that you just cut.

6
Repeat 4 times to make a full square.

I cut mouldings to frame out the beadboard on my bathroom
cabinet that I recently updated.
For full tutorial on this cabinet, check out my tutorial page at the top of my blog.


~~~~~~~~Next, how to cut mouldings such as baseboards, chair rail, etc.


1
Set the miter angle at 45 degrees to the left.
2
Place the moulding top up, face out and tight against the fence of the saw
3
Make your cut with the waste side to the left of the saw blade.

5
Reposition the miter angle to 45 degrees to the right.

6
Make your next cut with the waste side to the right of the saw blade.

7
Nail into place and admire your work.

**This will cut an outside corner. To cut the inside of a corner you would follow the same instructions, only you would be using the other side of your cut. For example, in the above picture I have cut an outside corner (left piece) and have discarded the right piece of my moulding & for an inside corner you would use the right piece and discard the left piece. ***
~~~~~~~

Crown Moulding

Crown Moulding is a little more complicated to cut but is definitely worth the time.
How To Cut Inside Corners
1
Set the bevel angle of your miter saw at 33.85 degrees.

2Set the miter angle of your saw at 31.62 degrees to the right side of the saw table.

3Place the crown moulding face up with the top of the moulding against the fence of the saw table and the waste end facing to the right.

4
Make the cut. Keep the left side of the cut. Waste the right side of the cut. This is inside corner piece "A."

5Turn the miter angle to 31.62 degrees to the left side of the saw table. Leave the bevel set at 33.85 degrees.
6Place the crown moulding with the bottom of the moulding against the table fence and with the waste side to the right of the saw blade.
7Make the cut. Save the left side of the cut. Waste the right side of the cut. This is inside corner piece "B."

8Nail it into place and admire.

How To Cut Outside Corners


1
Set the bevel angle of the compound miter saw at 33.85 degrees.

2Set the saw miter at 31.62 degrees left of the saw table.

3
Place the crown moulding face up with the bottom of the moulding against the fence of the saw table and the waste end facing to the left.

4Make the cut. Keep the right side of the cut. Waste the left side of the cut. This is outside corner piece "A."

5Move the miter angle to 31.62 degrees to the right side of the saw table. Leave the bevel set at 33.85 degrees.

6
Position the crown moulding with the top of the moulding against the table fence and with the waste side to the left of the saw blade.

7Make the cut. Save the right side of the cut. Waste the left side of the cut. This is outside corner piece "B."

8Next, fit and nail into place.


~~~~~~~


Layering Mouldings


For a beefier and more impressive moulding, I like to layer mouldings.
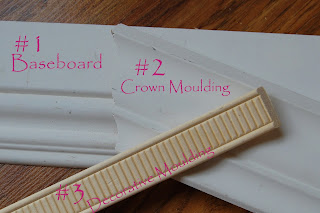
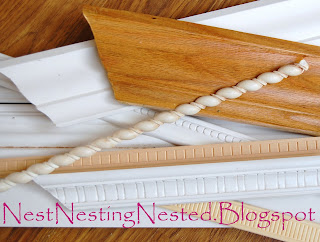
For my kitchen cabinets I layered crown moulding, baseboard, and a piece of decorative moulding.
First, I built up the top of my cabinet with a 1x4. I screwed it directly to the top of my cabinet and made sure it was flush with the cabinet front. I did this so that I would have a strong surface to nail my mouldings to.
Then I cut and nailed (using a finish nail gun) the (upside down) baseboard, cut and nailed the crown moulding onto the baseboard, and finished it out with the decorative moulding.


Wednesday, March 9, 2011

modge podge on canvas


I made this canvas art myself using some very inexpensive items.

Here's what I used...

1. A canvas picture from the dollar store
2. Napkins from the Marshall's store 
3. Mod Podge 
4. Gel glaze
5. White paint 


Here's what I started with - a canvas art from the dollar store.


I painted the canvas white first one direction, and then the opposite direction after the first coat dried to give it a canvas-like texture.

After the painted dried completely, I gave the entire surface a coat of glaze.  You can see how it adds texture.


I then took one of the napkins 
and separated the layers....leaving only the outside layer.


The next step was to apply Mod Podge to the canvas.


I then applied the napkin to the canvas, (I left a few wrinkles in the napkin to give it a more aged look) allowing it to dry completely.  After it was dry, I then applied 2 more coats of mod podge, brushing in different directions to give a canvas like look. 


After the final coat of mod podge was dry,
I applied another layer of glaze giving it an aged look.

antique finished corbels

I am going to give you the steps of how I created this chippy timeworn patina to these cheap corbels from Home Goods.

Let's start at the beginning. This is how they looked before I got started.


First thing I did was clean them good with Krud Kutter or you can use another brand like TSP. This gets all the grime off and cuts the shine. Then I brushed on white paint using Sherwin Williams creamy.


Next I used Alexandria Beige by Benjamin Moore mixed in Sherwin Williams paint. I dry brushed this on to give the look of wood. I originally was just going to make these look like wood, but I kept on going.


Third paint color is silvermist by Sherwin Williams and I just dry brushed this on in several spots. It is the gray looking color.


Fourth color is a by Decor Art. I used Elegant Finish metallic glaze in Renaissance Brown just dabbed on in spots that you can see here. Fifth color is Valspar Glaze in Mocha brushed all over this and then I wiped a lot of it back off. 


Here is where I didn't leave it alone. It was fine, but I wanted it to really look like a French antique piece from many years ago. I dabbed globs of spackling paste all over and let it dry over night. I got this idea from my friend Sherry at No Minimalist Here blog when she did this to a pair of candlesticks and I loved the look.


After the spackling was dry I mixed the color Seal(black) by SW with glaze and brushed it all over to age this and then dabbed some back off not to rub the spackle off.


Next was some rub in buff in Patina added with my finger in a few spots. Patina is the aqua colored spots. Then I decided to put a few spots of gold back to make it look like it used to be that color long time ago and was showing through the aged layers. I used  some gold metallic paint in a little tiny model paint bottle and a little brush and brushed it on in a few places.


vintage style postcard pillows


This is how you do it.  There are a few variations in how you can do these {I've tried them all} and each variation has is benefits and drawbacks.  This time I used Variation One so the images you will see will be of pillows made using Variation One.


Variation One:  Fast and Easy but still SUPER cute.
            Supply List:  Osenburg fabric, all purpose spray glue, Fabri Tac fabric glue, instant coffee,
                                tea bags, clothes pins, poly-fiber stuffing, computer images of your choice
                                {all of my images I got from The Graphics Fairy and Land of Nod Studios}
                                 and an inkjet printer


First get yourself some lovely Osenburg fabric.  It's one of my favorites.  It's cheap but has the beauty and texture of linen.  If you are only going to make a few, a 1/3 of a yard will be plenty!  Dye your fabric if you would like to.  I use a combination of tea and instant coffee.  Allow to hang dry.  I usually dye the night before so I can work first thing the next morning.
  1. Cover your workspace with cardboard and lay out your fabric.  Spray the fabric generously with the spray glue.  {I recommend opening a window because you might get a little loopy from the fumes if you don't}  Lay out regular computer paper across your fabric.  One sheet for each pillow you're going to make.


2.  Cut out fabric being very careful that no fabric extends beyond the paper.  {You don't want the fabric to get caught in your printer!}  Wait a few minutes so the glue dries. Then load one sheet of paper/fabric combo into your printer.


3.  Select the image.  Using Word enlarge/shrink or rotate the image so that it take up 1/2 of the paper.  Print baby, print.  Gently peel the paper away from the fabric.

    4.  GLUE!  {you can do right sides together for a more finished look or wrong sides together for a more rustic look}  Run a thin bead of Fabri Tac along 3 of the sides, fold over and press.  I use clothes pins to secure the pillow.
5.  Wait about 3-4 hours to allow the glue to dry.  Remove clothes pins {you might have to pry them off if glue get on them but I've never had a problem with one getting really stuck}.  Stuff your pillow with Poly-Fiber stuffing.  Again run a thin bead of Fabri Tac along the unsealed edge and use your clothes pins to clamp shut that edge.  Again, allow to dry 3-4 hours.  TaDa!  Mini pillow.  Great for mantels, bookshelves, grouping in a bowl or basket or on furniture.


Variation Two:  Longer but more vintage and rustic looking


1.  Follow all the instruction above, skipping the dying of the fabric and you will stop after you print out your image.   This is the HARD part....allow your fabric with images printed on it to sit and rest for at least a week.  I know, it's so HARD to do this but definitely worth it for the effect it gives.* I also highly recommend using only very clear black and white images or very vibrant color images for this variation because there will be significant fading.*

2.  Dye your fabric in tea or coffee or both.  Turn oven to 225 and bake the fabric on cookie sheets.  Flip fabric over every 10 minutes until completely dry.  The fabric will be stiff and have brown marks all over.

3.  Continue following the instructions in Variation One.  Your pillows will look aged to perfection.

Variation Three:  Sewing your pillows {A softer more "pillow like" pillow}

1.  I recommend dying your fabric first like in Variation One. 
2.  Instead of using spray glue.  Get yourself some Freezer Paper.  Lay out Freezer paper {wax side up} and place fabric on top.  Iron fabric until it is secured to the Freezer Paper.  Flip paper/fabric combo over and trace the outline of a sheet a computer paper onto the Paper side of the Freezer Paper.  Cut out, again being very careful that no fabric extends beyond  the outline.
3.  Insert the Freezer Paper/fabric combo into your printer and print image.  Gently peel off Freezer Paper.
4.  Fold fabric with right sides together and pin 3sides.  Sew the three sides shut and stuff you pillow.  Then pin and sew your final edge shut.