Friday, July 30, 2010

STAMPED TWILL TAPE


stamped twill tape


Here is a simple way you can personalize any gift, card or scrapbook page. You can use any stamp, ink pad, and twill tape to make a cute ribbon that will add a special touch to your gift.


We've used pigment and dye inks, and both work well. Staz-On is also an option. You can even use re-inkers to dye your twill a different color!

To personalize your twill tape, just cut it to the size you need, select your stamp and ink, and stamp away. Try repeating an image over and over, or using alphabet stamps to write a message. You can buy twill tape in various widths and colors, so the options are endless.

(In case you are wondering...here are the links to my stamps: Cupcake and Wish BigSeattle Space NeedleParis). Our friend Anne Beale also sells a collection of three sizes of twill tape on one card--a great way to test this technique out. Enjoy!

Wednesday, July 28, 2010

GIANT ART


Big Art from Small Items

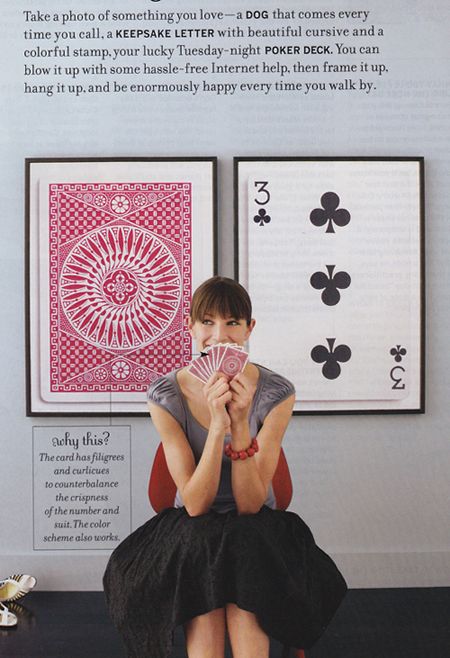
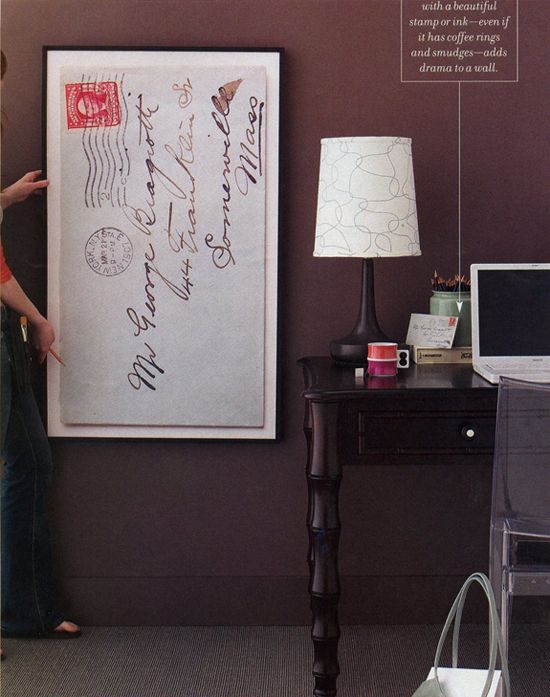
An idea from Blueprint that I did love was to photograph something that's small, blow it up really big and frame it.


I love the antique letter here. The handwriting, the stamp, the ink smudge...


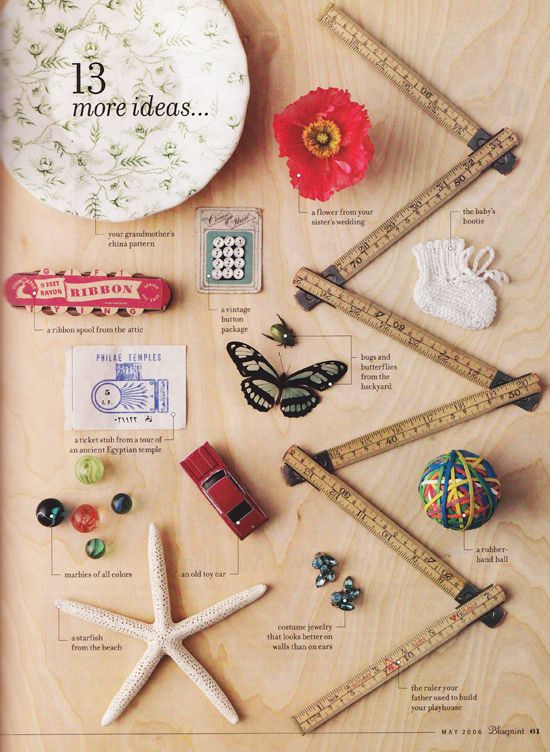
Other items they suggested photographing: a pretty flower from your sister's wedding, your grandmothers china, a vintage button package (reminds me of this post), an old ruler, a cool ticket stub that brings you happy memories...


Here are a couple of sources for large-format printing:

U Printing (I've heard these guys are especially good)

Large Format Posters

Mega Print

Monday, July 26, 2010

Numbered Tags


rench Enameled Numbers


I've been perusing french blogs lately. I can't read a lick of the language but haven't taken the time to Google translate because I'm mesmerized by the pictures. One item I run across time and again are those wonderful enameled numbers. (I read that they are vintage wine barrel markers) I've been dying to create my own.

The trick seems to be in finding the blank tags. I got these brass ones at my local True Value hardware store in the key department. You might even try a pet store. If all that fails, google "metal tags" for lots of sources on the internet.

Materials
metal tags
sand paper
white spray paint
StazOn ink pad
clear embossing powder
parchment paper
twine

Tools
number rubber stamps
electric fry pan
spatula

Lightly sand the tags to provide a tooth for the spray paint.

Spray the tags with white paint then allow to dry. Using black StazOn ink, carefully stamp numbers in the center of the tags, beneath the holes. *note - placement of the numbers was the hardest part. I think I will invest in clear number stamps in the future.

Place a sheet of parchment paper or aluminum foil on the surface of an electric pan. Turn the heat to 350ยบ and heat tags for about 30 seconds. Remove with a spatula and place on a piece of copy paper. *Even though I show a large number of tags, it's better to do just few at a time.

Immediately cover the tags with clear embossing powder. The heat from the tags will warm the powder and slightly melt it. When cool, shake off the excess powder. Place them back on the fry pan until the powder fully melts. (just a minute or two) Remove.

I threaded twine through the hole and wrapped it around an old mason jar.


I've seen these tied to candles, flower pots and glass cloches. Perhaps for table numbers at a wedding? Tag your own wine?

Enjoy a little bit of France in your part of the world. Tres jolie.

Saturday, July 17, 2010

DESSERT RECIPE


y Favorite Dessert For The 4th Of July...


I was a little girl when my mom started making this 4th of July dessert for our family, and now I make it for mine.

And as far as we are concerned...

Independence Day just isn't complete without it!


It's pretty and delicious and entirely worth the effort it takes to make it!


.............................................................................


Red, White and Blueberry Dessert Squares
Crust:
1&1/2 cups flour
3/4 cup brown sugar
3/4 cup margarine or butter
3/4 cup finely chopped walnuts

In a large bowl combine flour and brown sugar. Mix well. Using a pastry blender cut in butter until coarse crumbs form. Stir in walnuts. Lightly press mixture into a baking sheet measuring 15" x 10" x 1". Bake at 325 degrees for 10-15 minutes or until golden brown. Cool completely.


Sprinkle 1 pint of fresh blueberries over baked crust.


Filling:

8 oz. cream cheese (softened)
1 tsp. vanilla
1 - 7oz. jar of marshmallow creme
1 - 8oz. container cool whip (thawed in fridge)

In a large bowl beat cream cheese and vanilla until light and fluffy. Add the marshmallow creme and beat just until combined. Fold in cool whip. Spread over blueberries. Refrigerate about 1 hour or until firm.


Sprinkle 1&1/2 pints of fresh raspberries over whipped topping.


Glaze:

2&1/2 cup sugar
1/2 cup corn starch
4 cups water
1- 0.6oz package raspberry Jello

In medium saucepan combine sugar, corn starch and water. Mix well. Cook and stir constantly over medium heat until mixture thickens and becomes clear. Remove from heat and stir in Jello until dissolved. Cool glaze until lukewarm. Carefully spoon glaze over raspberries all the way to edge of pan. Refrigerate about 1 hour or until firm.


Cut into squares (the bigger the better!) and enjoy!

Makes about 25 squares.

Make sure to store any uneaten servings in the refrigerator or the dessert will melt.

.................................................................................


I hope you all have a wonderfully delicious 4th of July!

HYPERTUFA POTS


Making Hypertufa Pots

.
*Today I am sharing my guest post that was posted last week over at Remodelaholic.
.
I made these hypertufa pots after seeing this article in the March 2010 issue of Martha Stewart Living Magazine.  My Mom and I made hypertufa pots a few years ago using a similar method.  They were larger than these and not quite as cool!  When I saw this article I knew I had to try again.  It's actually a pretty easy project.
.
.
Supplies you will need:
- Various containers.  You can use almost anything but I collected plastic and cardboard containers.  I also used metal but it didn't work for me (more on that later!).
- Peat Moss
- Perlite
- Portland Cement
- Mold Release Spray (I ended up using a no-stick cooking spray after researching online.)
.
.
.
.
The perlite, portland cement, and peat moss are all readily available at Home Depot or Lowes.  Make sure that you use real portland cement and not a quick-set material.  Also, you want to use peat moss that is finely ground and not in large pieces.
.
.
In order to make your mold you will need to nest two containers together.  Both should have sides that are straight or taper out and make sure that there is a gap of at least 3/4 between them.
.
Mix together equal parts perlite, peat moss and portland cement in a large container.  The amount you use of each does not matter as long as they are equal parts.  I used 2 quarts of each.  A wheelbarrow would be great to use for mixing, but I don't have one so I used an old rubbermaid container.
.
Make sure you wear gloves!
.
.
Slowly begin to add water and mix until mixture is the consistency of cottage cheese.
.
.
Coat containers with mold release spray.  Pour mixture into the outer mold until it is an inch thick.  Add the inner container and start adding mixture around all the sides.  You can fill the inner mold with sand or water to steady it.  Pack mixture in tightly.
.
.
This is what my containers looked like after I had added the mixture.
.
Cover the containers with plastic.  After 24 hours remove the inner mold.  Replace plastic.  After 36 hours remove outer mold.  This is where I had a little trouble.  I was able to easily remove the plastic and cardboard containers.  But the one metal container I used would not come off.  I guess I should have followed directions and used mold release spray.  Stick with cardboard and plastic and you won't have any trouble!
.
After removing molds, you can drill holes using a masonry bit in the bottom of the container for drainage.  Also, use a planer file or sand paper to smooth out any rough edges.
.
Recover containers with plastic and let sit for several weeks in order to finish curing.
.
Finally, your pots will be finished!
.
.
Aren't they cool?
.
.
I planted with succulents and placed the pots in my screen porch.
.
.
.
.
.
.
I am just thrilled with these little pots.  I love how they turned out!
.

HORIZONTAL PAINTED WALL STRIPES


Painting stripes


I got an email asking how to paint stripes on walls after seeing my parents bathroom re-design. All you need is a laser level, frog tape, and paint. It's a little tedious but a lot cheaper than wallpaper.

I'm including photos of my brother's bedroom from a few years ago. He told me he wanted me to design his room but he wanted no color and something cool on the wall. I thought maybe a racing stripe or two. He also stressed that he wanted it to be modern and not pretty because he's a man, haha.

Unfortunately for me, I didn't know about frog tape when I started my brother's room. Frog tape is soooo much better than blue painter's tape. There is NO bleeding, it's the best ever when adding a painted graphic to a wall. Its a little more expensive, but it's worth not having to go back and touch everything up by hand.

Be sure to measure out the size of the stripes you want and place them evenly on the wall. Draw a sketch to see if you like it. A laser level is important because who wants a crooked stripe?! Plus it shoots across the whole wall so you don't have to worry about veering up or down. Tape up the stripes and paint, it's that easy!


Saturday, July 10, 2010

wall shelf


Headboard Shelf Tutorial

Last week I finished this project because I've been living without a headboard for three years . . .

Today I thought I give you all a quick how-to so you can make your own!

You will need . . .
one 1X10(faceboard)
one 1X6 (top #1)
one 1X8 (top #2)
three shelf supports
wood screws
finish nails

Step One:  Cut the boards to length.
I cut the faceboard to the length I wanted for a king size bed.  Top #1 I cut 1" shorter than the faceboard.  Top #2 I cut shorter than the faceboard by 1 1/2".  This gave me the tired look I was going for.

Step Two:  Attach top #1 and top #2 together.
(I predrilled all the holes as I went along - not sure if it was needed though)


Step Three:  Attach top boards to faceboard


Here's the view from the back

Step Four:  Find bracket placement and attach.

Mark the middle of the shelf and attach bracket, both from the top and the back.
Here's how it look with one bracket attached.
Look I have a helper!
Here's how it looks with all three brackets attached.  Starting to look like a shelf!

Step Five:  Cut and attach moulding.

I used this mounding for the space between top#1 and top#2

Cutting it to length and attaching with brad nails this is how it looks.
Here's another view.

Next I added the moulding onto the two faceboard sections between the shelf brackets.  I used a small half round moulding.
First draw lines where you would like to place the moulding.  Next measure and cut the moulding making sure to give each section a mitered corner. 

Attach once again using brad nails and it should look like this.
(next time I think I would just glue the sections on instead of nailing)


For the top shelf edge I used a large half round, once again mitering the corners and attaching with brad nails.

Here she is all built - Yippeee!

Step Six:  Paint and hang.
I used a black satin paint and distressed the edges a bit.

Finished product...
She turned out great don't you think?  If you'd like to take a look at my original post visit here.